One side effect of a world without privacy is an increase in authenticity. No more hiding behind screen names. Anonymity has its uses, but the value of authenticity can’t be calculated- especially for small businesses. Customers want to know more about you, not just your products and services. Adding an author bio and a profile picture to every blog post enriches the content and builds trust. You could add this content manually to all those posts, but we recommend using a plugin to manage your blog’s author bios. For WordPress users, there’s an easy solution that adds a neat “About the Author” box to every post.

Fancier Author Box is a free plugin that hits the spot, but requires a little bit of prep before you install it.
In WordPress, author names are matched with a user account. So, make sure you setup all the author/user accounts you need. And make sure each of your authors has a WordPress.com account attached to one of their email addresses. This should be the same email address attached to their user account on your self-hosted WordPress site.
Fancier Author Box displays a profile picture next to your name and author description. This picture is taken from a service called Gravatar, part of WordPress.com. All you have to do is update your WordPress.com profile with a picture to make it work.
Once you’ve added a profile picture on WordPress.com, you’re ready to take the next step. It’s time to login to your WordPress site. Once you reach the Dashboard, follow the directions below.
5 Clicks to Install Fancier Author Box
- Look in the left-hand sidebar for Plugins. Hover your mouse over this item to see a pop-out menu. Click Add New.
- Find the search box and type “Fancier Author Box”. Click Search Plugins.
- Find “Fancier Author Box by ThematoSoup” in the search results. Click Install Now.
- When the dialogue box asks if you’re sure you want to install this plugin, click Ok.
- The plugin will install automatically. When it’s done, click Activate Plugin.
5ish Clicks to Configure Fancier Author Box
- Look in the left-hand sidebar for Settings. Hover your mouse over this item to see a pop-out menu. Click Fancier Author Box.
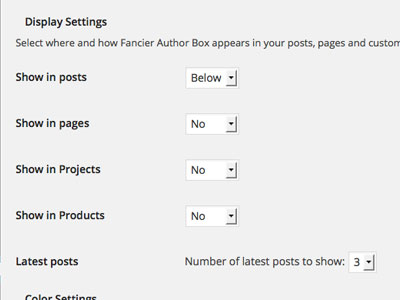
- Choose your display settings with the drop-down boxes. See the screenshot for my recommendations.

- Next, choose your color settings. The defaults make-up a nice gray and black look that works with any theme, but you might use your brand colors instead. Click Save Changes.
- Look in the left-hand sidebar for Users. Click Your Profile. Enter your name info. Use the “Display name publicly as” drop down box to choose how your name will be displayed. Write a short description of yourself in the Biographical Info box.
- Look for the contact Info section. Make sure the email address entered here matches the email address from the author’s WordPress.com account.
- Scroll a bit further down to the Fancier Author Box User Details section. Enter the URLs for the social media profiles you want to link to. Fill out as many of the social media URLs as you want to. What you don’t fill out won’t be displayed. Click Update Profile.
These steps customize Fancier Author Box for one author. To customize the plugin for other authors, login with an administrator account. Click Users > All Users to access a list of all the user accounts on your site and customize the author box settings for the rest of your authors.
Fancier Author Box is a great free plugin to add author bios to your site. Get more customizability and cool features like co-authored blog posts with its extra classy sibling Fanciest Author Box.
Like a heart shaped locket that says “To thine own self be true”, a fancy author box reminds you to be yourself when you write. And when your face is displayed at the bottom, the writing better be good. Talk as if you’re talking to your customers in person, because you are. Answer their questions with authority and warmth. Show them your face and give up a little privacy to share your authenticity.
