Show Your Service Area with an Interactive Radius Map
Do you have a plumbing website? Are you a home contractor of any kind? Does your business provide services to customers at their own home or office?
If so, you’ve got a limit on how far you’ll travel to do your thing. Customers need to know this. They don’t want to hire someone just to discover they live too far away.
An online map of your service area tremendously helps this situation. Here’s how you do it: Call up your graphic designer and get the original art file from that old brochure. Send the file to your web designer and it’s all good. At least, until you say this:
“So, my map… can it be interactive? Like Google Maps?”
You mean something like this?
That’s a little different. But not impossible. You might even be able to do it yourself.
What We’re Doing
We’re going to use free online tools to make a map widget like the one above. This map will have a circle overlay to illustrate the area where you provide services.
What You Need
A Google account for your business.
We’re making this map with Google My Maps. This tool lets you add directions, shapes, and location pins over Google Maps. A collection of directions and shapes over an area can be saved as a map you can save and share.
Since this map is going to appear on your website, the map’s author and owner should be a Google Account used only in association with the business. That way it won’t be deleted or lost in somebody’s personal account.
You should already have a Google account that owns your website’s Google Analytics Data and manages your Google My Business listing and Google+ page. Go ahead and use that account.
Not sure if you have a Google Account? Get in touch with a marketing consultant or web designer to answer your questions.
No Google account? No prob. It’s easy to sign up for a Gmail account. You’ll need to use a real person’s name and birthday, but feel free to create the email address with your business name.
Circle shape import file
This is the real key. As we’ll see later, Google My Maps lets you draw shapes by clicking points on the map. But we need a perfect circle to illustrate a radius. Who wants to click 360 points and drag each into perfect circular alignment? Nobody.
Instead, we’ll import a KML file into Google My Maps that contains a ready-made circle. Don’t worry what KML means. Like Lil Bub, it’s Internet magic. Just let it work.
Download sample_radius_circle.zip and save it to your computer’s desktop. You’ll need to unzip the file.
I made that template by modifying one I found by searching for “google maps radius” and choosing the search result titled “Free Map Tools Radius”. If you’re nervous about using my file, feel free to export it from the original map.
Make Your Radius Map
If you’re already signed-in to Google, that’s cool. If not, do it now! Go to google.com and click “Sign in”.
Once you’re signed in, find the Google Apps icon. That’s the 3×3 grid in the upper right corner near your profile picture. Click the icon to display the icons of popular Google things. Click on Maps.
![]()
Once you’re in Google Maps, find the menu icon in the upper left, next to the Maps search box. Click the icon to open the menu. Click My Maps in the second group of icons.
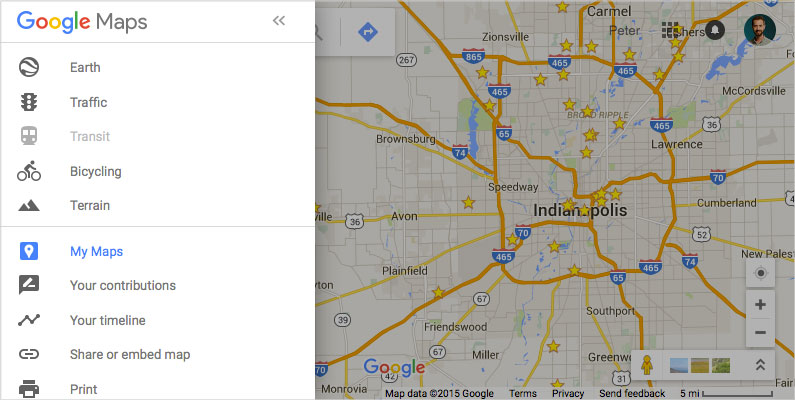
At the bottom of My Maps panel, click “Create Map.” This opens a new tab.
Now, let’s title our map. Click “Untitled Map” in the upper left to edit the map title and description. Use your business name as the map’s name.
Here’s where things get magical. Remember the circle shape import file? If you haven’t already, click here to download it. Once you’ve got the file saved to your computer and unzipped, click Import under the layer name.
Use the dialog box to upload the KML import file. When it’s done, your map will have a circle you can resize and reposition to reflect your service area. You will need to reposition it.
The download provided includes map data that sets the circle over Indianapolis. Just click once on the shape to select it. Then you can click-and-drag the shape over your city.
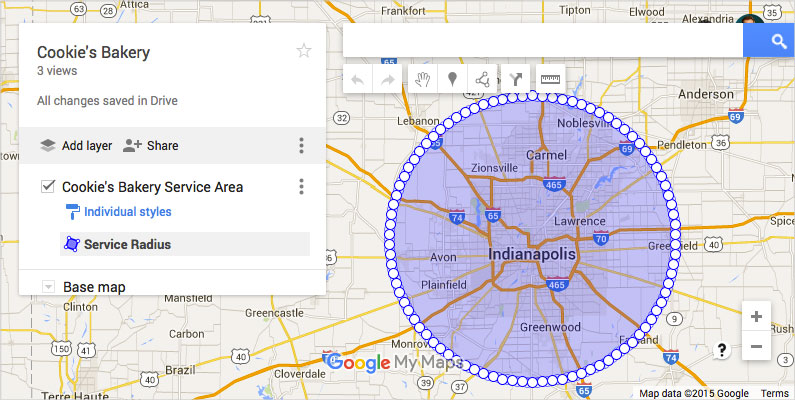
So, you’ve got the circle moved over. Neat! Oh, but it’s the wrong size. Ack! Not a big deal. You can resize it easily. Pay close attention to the next step.
Zoom in on the map so you can see the solid line between points. Click on this solid line and drag it to cover the right areas. You may need to zoom out and take a look at the new position and zoom in again to click the line and adjust it more. This takes a little trial and error.
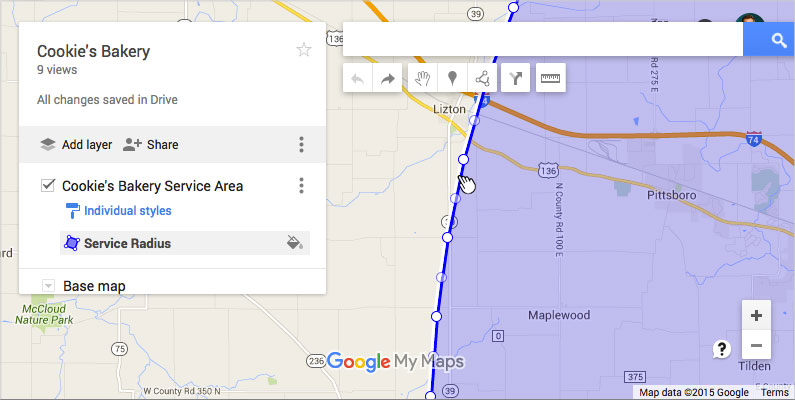
Don’t worry about messing up the shape. You can always delete yours and re-import a fresh one to try again.
Next, re-title the shape layer of our map. Click “Untitled Layer” and name your layer something like Cookie’s Bakery Service Area.
For the final touch, you should rename the shape to something like “Service Radius.” All your changes automatically save.
What You Do Now
Don’t you feel accomplished? I sure do. That’s one seriously cool Internet thing we made. So, what now? To put it on your website, we’ll need to make the map public, get the embed code from Google and copy and paste that into the right spot on your site.
To make the map public, click the Share button to open the Sharing Settings. Find the area titled “Who has access” and click on the Change link. Change the Link Sharing setting to Public and Save. Then click Done in the Sharing Settings screen.
Next, we’re going to get the embed code for the map. Click the menu icon in the menu options panel. It looks like three stacked dots. Choose “Embed on my site” to open a box with your code inside.
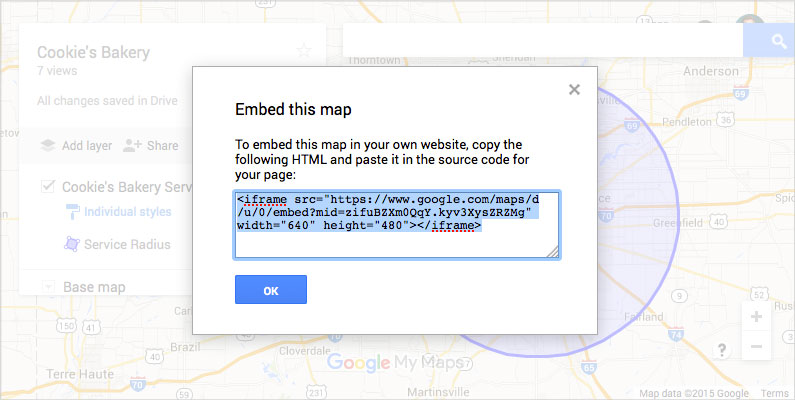
Now you can copy this code and send it to your web designer or paste it into your site yourself. Woot!
Your customers will think you’re a web wizard. And they’ll enjoy the boosted interactivity on your site.
ready to take your website to the next level?
Grab a copy of our web fitness plan today.

Call to Action Do’s and Don’ts
There is such a thing as a bad call to action The goal of any page on a website, whether it's the...
Let’s Talk Web Navigation
The Web Navigation Bar (aka, the nav & primary menu) The web navigation bar is a custom-built...
Canning Cookies, Creating Cohorts: Google’s Advertising Shift, Explained
The devs over at Alphabet are not just trying to bolster their profit; they’re trying to make something that could be problematic better and more secure.
A Deep Dive into Web Scams
What exactly are web scams? Web scams are illegitimate internet websites used to deceive users...
