I don’t recommend putting Facebook on your website. Don’t attempt to populate your website with native Facebook content (your posts, people’s comments, pictures, etc).
That’s the best practice. Don’t.
Too blunt? Maybe. I don’t hate Facebook, I swear. But let’s talk about why I can’t give that recommendation and follow-up with what you can do if you still want to add it.
There’s a Better Way To Engage
Clients frequently ask about ways to add their Facebook posts to their website, or post to both at once. I always ask why.
Here’s some of what they say:
I see other companies doing it.
Doesn’t mean it’s smart. Ask the other companies why do they do it. Maybe they’ll say:
We have great engagement on Facebook. Our website should take advantage of that.
Really? Take advantage of your popular Facebook page by pointing followers back to unique content on your own website. Dropping Facebook posts in the site itself just brings people more Facebook, not more of you.
I want more people to see our Facebook posts.
People who don’t like you on Facebook have zero use for your Facebook posts. You can tell because they don’t like you on Facebook (yet). And that could be most everyone who looks at your website. Don’t show people things they won’t find useful.
I want more likes.
See above. You want people to see your posts? You want more likes? Improve the content you share on Facebook. Make it well known that you have a Facebook page. Pay for advertising.
So, You Still Want the Facebook on Your Website
I tried to convince you. I did. Facebook is part of the promotion for your website content, not a replacement. But you may still want to embed Facebook junk in your site, for whatever reason. It’s actually pretty easy if you know where to look.
But this could change. Facebook’s clearly on the move to lock down its walled garden, with your visitors inside. But that’s a tale for another day. For now, let’s go step-by-step through embedding the Facebook Page Plugin on a WordPress website.
Google “facebook page embed”
The first result is Facebook’s own recommendation for integrating Facebook with your website. I’ll be combining a walk-through of setting up your plugin with steps specific to adding it on most self-hosted WordPress sites.
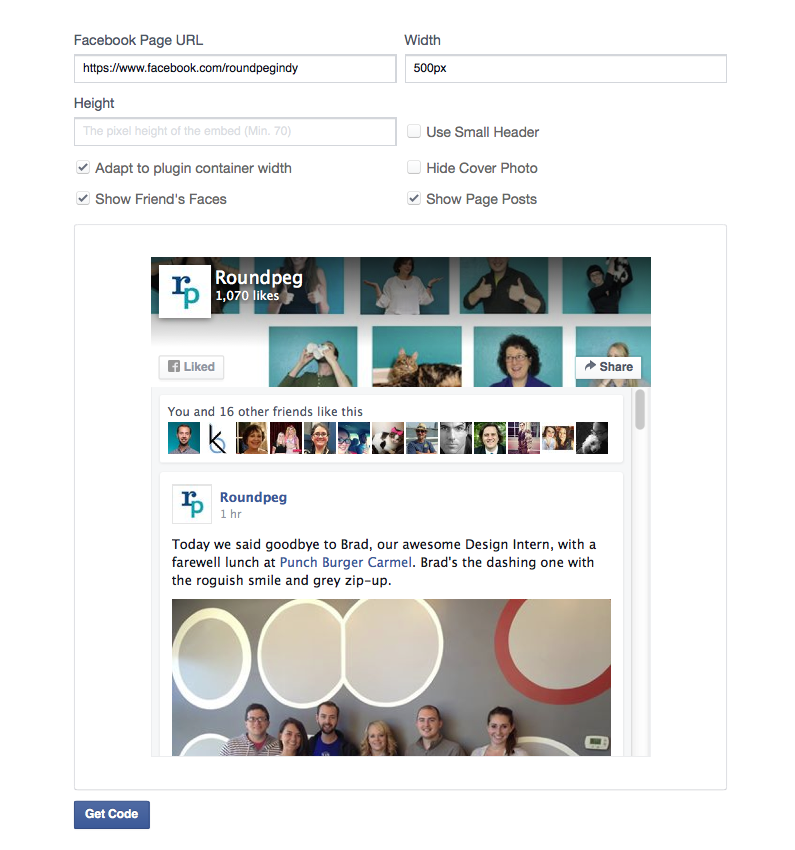
First, you need to find the URL for your Facebook Page and paste it into the “Facebook Page URL” field. The Page Plugin will automatically recognize your Page and show a preview of what your embedded Page will look like.
The other settings let you adjust the width and height maximums. Make sure to check the “Adapt to container width” option. This means you don’t have to worry about width and height, the plugin will automatically fill the whole width of the container you put it in.
There are three additional options for controlling the actual content of the Page plugin. I prefer to use the small header and not show page posts. That configuration is great for putting up in your website sidebar to encourage visitors to like the Page.
You can also go whole-hog with a big header, “Show page posts” and “Show Friend’s Faces”.

The Plugin tool refreshes the Preview with each selection so you know what you’re getting. Once you’re satisfied, click Get Code. Facebook will generate two sets of code, both of which need to be added to your site. We’ll talk about how in the next steps.
Copy the Embed Code to Your Site
Here’s where things get tricky and your steps to completion may be different. If you’re not sure what to do with the code Facebook provides, contact your friendly, neighborhood web developer. I’ll walk through the basic steps I recommend for a self-hosted WordPress site.
First, we’ll install and activate Insert Headers and Footers. This plugin makes it easy to add code to the header and footer files loaded when any of your web pages are loaded. Facebook instructs you to add the Javascript SDK right after the opening <body> tag. Insert Headers and Footers let’s us add any code we want right before the closing <head> tag, which is just as good.
To install Insert Headers and Footers, go to Plugins > Add New and search for the plugin title. Follow the prompts to install and activate it. After activating, you’ll find the plugin settings under the main settings item in the sidebar. Go to Insert Headers and Footers and paste in the Javascript SDK.
Not sure what the flip Javascript is? Don’t worry about it. It makes the rest of the plugin work.
Now that we’ve installed the first set of code, it’s time to really get different. The second set is what actually makes the Facebook Page Plugin show up on your site. Choose a spot like your website sidebar or footer. These areas are commonly managed by going to Appearance > Widgets. Add a text widget to your chosen area and paste in the code. Don’t forget to click Save.
And that’s it! You’ve integrated Facebook with your website using their official tool. Your time would have been better spent devising improved overall marketing strategies, but congrats anyway I guess. If you’re gonna do it, this is the quickest and best way.

