EDITIOR’S NOTE: As of this date, Roundpeg is not accepting guest posts on our site.
Guest bloggers will enrich your company’s blog and expand its reach. When these guests contribute to your website content, they bring additional expertise to make your site more useful and trustworthy to your customers. Pretty cool right? Creating and cultivating guest blogging relationships is a whole thing. But what do you actually have to do in WordPress to publish a guest post?
While you might be tempted to simply copy and past your guest’s content into a new WordPress post and hit the publish button with your primary user account, there’s a better way. Two better ways, actually. One is to publish all guest posts under one account. The other, better, way is to create a new user for each of your guest bloggers.
I prefer this method because it’s straightforward. Each guest blogger gets their own name on their post, rather than using the ambiguous Guest name in the byline. And it’s easier for your readers to look up your guest’s posts on your site and easier to hook up Google Authorship.
There’s some concern that adding many guest bloggers over time can be hard to manage, but I find the WordPress Users interface easy to use. Filter options and a simple search bar make it simple to find and edit a user’s information, even with 20 or more user accounts.
How to Give Your Guest Bloggers Their Own Account On Your Site
If you can set up an author in WordPress, then you already know how to create an account for your guest blogger. First, login to WordPress using your administrator account.
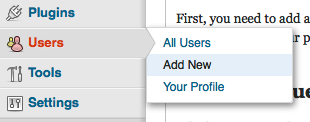
Find the Users section on the left side of your screen. When you hover over Users, a fly-out menu appears. Choose Add New from the fly-out menu.

Fill in the form on the Add New User screen. Use your guest’s first name or something else straightforward for the username. Use the email address supplied by your guest. Optionally, fill in their first and last name and website URL. Choose a strong password for your guest. You can also have WordPress automatically send your guest their password by email.
The next item on the screen below “Send Password?” is very important. Roles are the types of user accounts available in WordPress. Different roles come with different permissions and access levels.
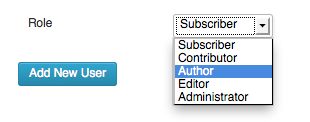
Don’t make your guest blogger an Administrator, with full control over your website. Don’t even make them an Editor. Choose Author from the drop-down box and click Add New User.

By making them an Author, you give your guest blogger access to create, publish and edit their own posts on your site. If you want to approve their content before it’s published, make an agreement with your guest that you get final approval before the post is published. If you want to enforce this approval process more strongly, give your guest bloggers the extremely limited Contributor role. Then, only an Administrator or Editor user can publish on your guest’s content.
Blogger Amy Lynn Andrews has a nice video walk-through where she adds a new Administrator user. Obviously, don’t add your guest bloggers as admins, but watch the video for an overview of these simple steps and a simple website security tip. The WordPress Codex has more detailed information about the Add New User screen.
Creating a unique account for each guest helps you and your guest better achieve your goals for blogging. However, some of our clients still prefer to use just one Guest account for all their guest bloggers.
How To Publish All Guest Posts Under One Account
First, you need to add a new user in WordPress with the username Guest. You can follow the steps above, just use Guest as the username and use an email address that you control, but isn’t your personal email. Then send your guest blogger the Guest user login information. Consider changing the password every time you use the account for a new guest.
Add Your Guest Blogger’s Bio and Google Authorship
Whichever approach you choose to adding a guest blogger, you’ll need to put your guest’s bio in their blog post and link the post to your guest’s Google+ profile with Google Authorship.
Giving guest bloggers their own account on your site makes this step really easy. The Jetpack plugin adds a way for your guest to connect their Google account when they login to your site. WordPress SEO by Yoast adds a similar function. To automatically add bios to your blog posts, check out some of these plugins.
If you’re using just one Guest account, you’ll most likely need to type the bio directly into the body of the blog post. And for you and the guest blogger to benefit from Google Authorship, the bio has to include a link to the guest’s Google+ page using a specific HTML link structure. 312 Digital explains this link structure in their post on Google Authorship for Guest Posts.
Adding a new user to WordPress is the easy part. It’s building guest blogging relationships that takes the effort. Get some extra help with these tips for working with guest bloggers.
