Lead capture forms are a pillar of effective download marketing. But they require a whole support staff of other tools and services in order to function. The effort brings in everyone from your website host to your form builder and email marketing software. Learn what it takes set up a lead capture form below.
Plan Your Strategy and Create Your Content
The first step is the hardest and it’s the one I’m going to gloss over. Before turning any of the other gears, you must start with strategy. Answer the question, “How does this lead capture effort fit into the big picture of my marketing?” I’ll give you a hint: it’s typically part of an effort to grow your email mailing list and nurture new leads for your sales team. The form asks for your customer’s email address in exchange for free access to compelling content. This download should be really, really useful the best way you know how. Try to answer a question (like a case study) or provide guidance (maybe through a worksheet).
Decide On Your Lead Capture and Content Delivery System
Where does the lead capture form come from? How does someone get the free download once they fill out your form? These two questions are often overlooked. You can code a form by hand every time if you want and manually send each individual email. But that sounds like a royal pain. I recommend using a form builder service like Wufoo or Formstack instead. That way you can focus on marketing strategy and tactics rather than learning to program. I’ll be using Formstack as an example in the how-to below.
Set Up A Lead Capture Form
1. Host Your Content
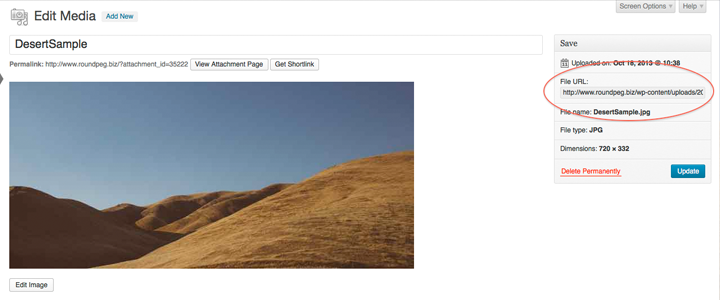
Your super cool and valuable content has to have a home on the Internet. To give it an address and make it downloadable, you need to host the file on a server somewhere. If you have a website, you already have storage space on the same server as your website. Access your website hosting control panel to upload your file there. And if you have WordPress, you can easily upload a new media file from the Dashboard. Once you’ve uploaded it, you’ll want to copy the physical location (or file URL) for the download. Depending on your setup, the link should look something like this:
http://yourwebsite.com/wp-content/uploads/2013/10/your-file-name
Use the Edit Media screen in WordPress to find the file URL.

2. Create a Lead Capture Form with Formstack
Once you’ve logged in to Formstack.com, click the the Create New Form button on the Dashboard. If you’ve never used Formstack to build a form before, watch the tutorial video below for a complete walk-through. Pay special attention to the information around 5:24 in the video to prepare for the next step.
You can build a form to capture as much information as you want. Feel free to ask for your customer’s most cherished recipe or the Top 5 Musical Crimes Perpetrated by Stevie Wonder in the ’80s and ’90s. It’s up to you.
However, complex questions or too many questions will quickly turn off any prospective leads. A good lead capture form will at least ask for Name and Email Address fields and have no more than one or two other fields. Once everything’s set up, you may want to duplicate your form and do some A/B testing to see what works best for you.
3a. Link Your Hosted Content to the Lead Capture Form
Finally, we get to to the real magic. With Formstack, you can set up a whole chain reaction to be triggered after every form submission. You might choose to send an automatic confirmation email that contains the download’s File URL. Or you might redirect people right to the File URL so your content downloads immediately after they click “Submit”. For now, I’ll talk about how to redirect to an external URL.
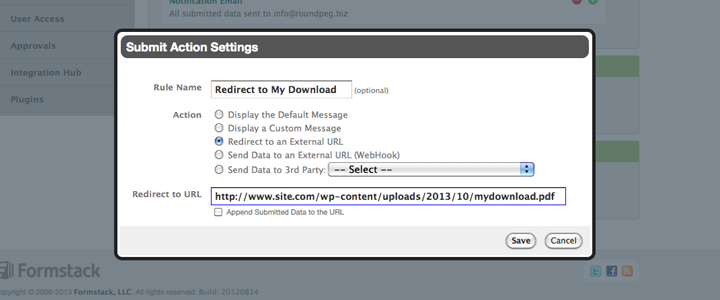
On the Settings tab, click “Emails and Redirects.” Then scroll down to the “After the Form is Submitted” area to start adding actions. Formstack calls these actions “Rules.” Give your new rule a name and choose “Redirect to an External URL” from the action list. Then just paste in your download’s File URL and click “Save.”

3b. Connect The Lead Capture Form to Constant Contact
Once a customer enters their email address, what do you do with it? You could manually collect this information in a spreadsheet and manually type it in to your email marketing software. However, Formstack integrates with popular services like MailChimp and Constant Contact to instantly zap customers’ info into your existing lists.
On the Settings tab, click Integration Hub and choose an email marketing tool. Follow the screen prompts to give Formstack access to your email marketing service and configure your form settings.
4. Create a Landing Page
So far we’ve created and hosted an awesome download, and created a lead capture form with Formstack. So, how does anyone actually access this form to sign up and get your download? You need a landing page. Now, Formstack forms can stand alone if necessary. Just find the form’s URL on the Publish tab under “URL Links”. That might be enough for you. However, you can also embed Formstack forms on your own website. I recommend pairing Formstack with a specialized landing page plugin like Premise. Of course, you can also embed the form on any page or post on your website.
What happens next?
The steps above are really just half of the story. Don’t forget to tell the world about your download. Link to it from a blog post, put an ad in your site’s sidebar, share it on social media, and invite your existing email list to share it with their network. You might even spend a little money on promotion with Google AdWords to push your landing page to a bigger audience.
Overwhelmed yet? There’s a lot to know and do. But as Sir Francis Bacon or Thomas Jefferson said, “Knowledge is power.” Get an overview of the whole process here. Want help? Get in touch and we can walk you through it.
