There’s a better way to embed offers and promotions in your blog posts. Previously, I wrote about a simple method to embed an offer in every blog post. It relied on inserting a linked image using the WordPress media uploader. And it works! Once you click Insert, the linked image goes right into your post.
Good enough, right? Almost. While that method’s technically enough to get one offer into one blog post, we can take this to the next level. What if you want to add the same offer to multiple posts? What if you want to make a bunch of different offers?
Ensure consistent implementation of your offer content by using shortcodes. These snippets are easier to handle than the long form of your offer content, but display the offer exactly the same way.
The idea is to enter your offer’s original design code or linked image into a specialized plugin that transforms it into a shortcode. Then, you can easily copy and paste an identical offer shortcode into all of your posts, or better yet, create several offers and strategically drop them into the most relevant posts.
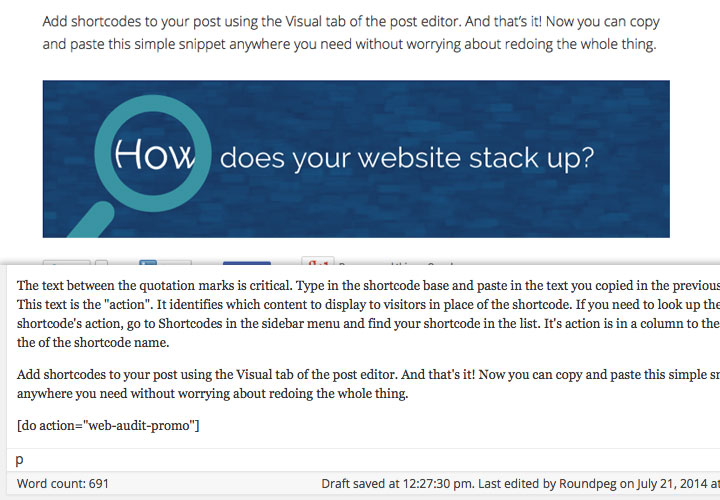
I’ve been really pleased with the Shortcodes Pro plugin installed on Roundpeg’s site. Below are screenshots of an offer displayed with a shortcode and the shortcode itself in the WordPress post editor.

The shortcode bottles up everything needed to display a linked image or customized code block . The steps below use the linked image example to walk you through making your own.
Finalize Your Offer Content
Always review your offer before deploying it. What information are you asking from visitors? What do you give in return? Are you satisfied with your landing page content? What about the offer content you’re putting in blog posts? There’s no point going forward with an offer if the marketing strategy behind it is flaky. Our inbound marketing budget workbook is a good place to start if you need to review. Once you’ve got everything on track, you just need the HMTL code (or PHP) for the offer content.
Going forward, I’ll use the linked image example from my earlier post which uses HTML. If you don’t already have offer content prepared, follow the steps there before moving on. Then, make sure to install and activate the Shortcodes Pro plugin.
Create Your Shortcode
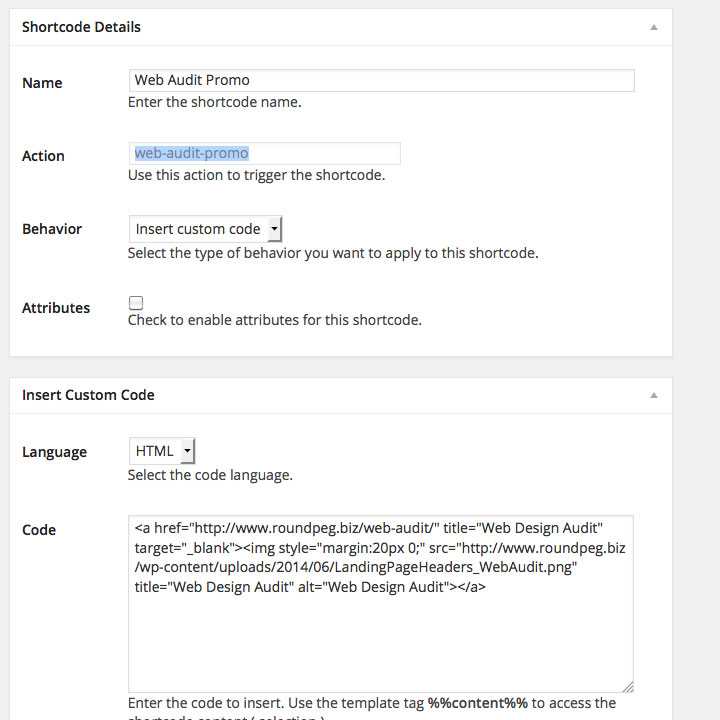
Once you’ve got the plugin activated, look for a new item in your sidebar that says Shortcodes. Hover over this new item and select Add New Shortcode from the fly-out menu. Fill in your new shortcode’s name. Keep it brief, as this name will be used later on inside the shortcode itself.
Next, choose a behavior. For this example, choose Insert custom code. Further down the page you’ll see the Language drop down box. Choose HTML. In the Code field, add your linked image’s HTML code.

At the bottom, there’s a few more options that allow you to add a button to your formatting toolbar on the Edit Post screen. Adding this is totally optional. But if you do it, make sure to upload a small icon image with the Button Image option. Then you’ll have a one-click way to automatically insert this individual shortcode.
Finally, click Publish. Once your shortcode publishes, you’ll see a new item on the Edit Shortcode screen that says Action. Select the contents of this box, right-click and copy it.
Add The Shortcode To Your Post
To use the shortcode with your post, you need to use the following format.

The text between the quotation marks is critical. Type in the shortcode base and paste in the text you copied in the previous step. This text is the “action”. It identifies which content to display to visitors in place of the shortcode. If you need to look up the shortcode’s action, go to Shortcodes in the sidebar menu and find your shortcode in the list. It’s action is in a column to the right of the of the shortcode name.
Add shortcodes to your post using the Visual tab of the post editor. And that’s it! Now you can copy and paste this simple snippet anywhere you need without worrying about redoing the whole thing.
