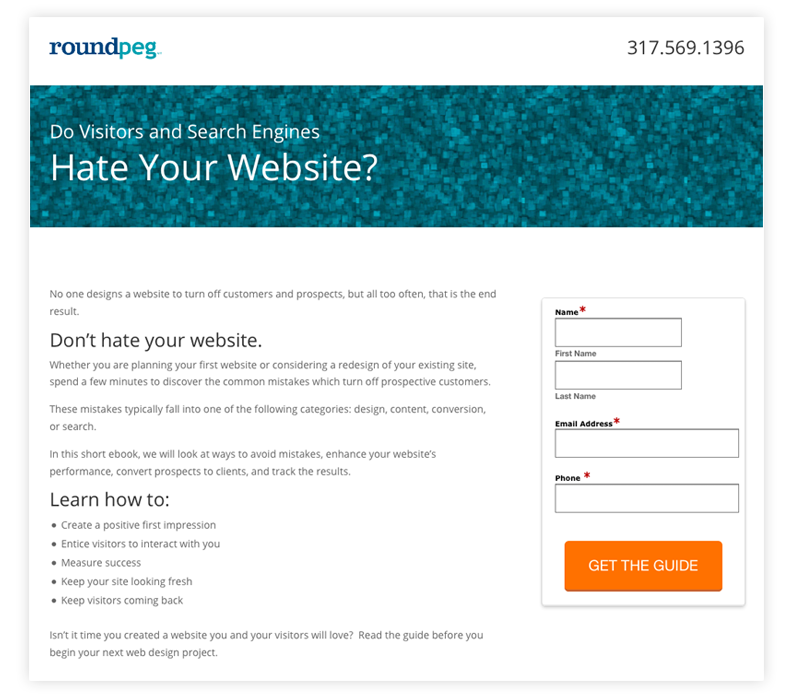
Landing pages are at the core of our marketing. They entice random visitors to get to know us a little better, trading their contact information for a cool download or special offer. We then stay in touch through a series of emails.
To attract new prospects, we create a regular stream of interesting content offers (white paper or checklist) which we think prospective clients will want. The content is important, but the design of the landing page is the key to getting people to say, “Yes! I want that!”
Anatomy of a landing page:
Roundpeg’s landing pages start with a simplified header that minimizes distractions. No menu. A prominent page title calls visitors to act. Simple, persuasive body copy describes the content visitors get in exchange for their information. A simple form collects the info and delivers the download content.
This page doesn’t look like anything else on our website. Except for the 14 other landing pages we made in a few minutes after making the first.
How’d we do it? First, a little about our site’s setup.
WordPress is our site’s content management system (CMS). The CMS helps you edit page content, but not how it looks. Which means the look and feel of the site is based on a theme. This theme is the foundation for the web design. We spent hours tweaking and customizing it to fit our brand.
Our theme is Divi, from Elegant Themes. It’s designed to be customized. There’s no rigid homepage template, like most themes on the market. Instead, you use an easy page builder to make sections and columns, filling each column with helpful modules to display your content. However, Divi comes with two presets for pages. There’s Default and Blank Page Template.
As I walk through our landing page building process, you’ll see how the Blank Page Template and saved layouts are the keys to distinctive landing pages with WordPress and Divi.
The steps below assume your website uses WordPress and you use the Divi theme. Divi isn’t just a landing page tool, it’s part of your whole web design. If that’s not your current setup, this won’t work. If you want to start using a setup like ours and you’d like help, contact us.
If your site is ready with WordPress and Divi is installed and activated, the first step is easy.
Add a New Page
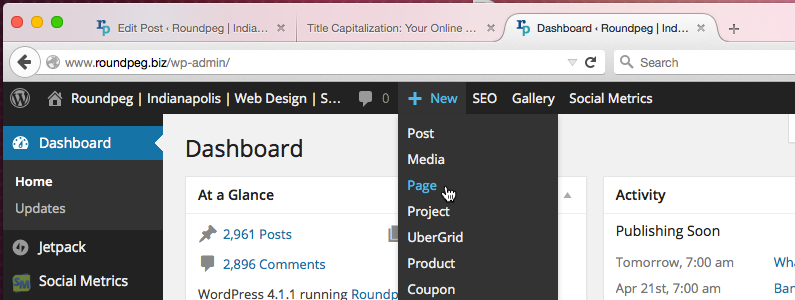
Mouse over the +New item in the WordPress toolbar. You’ll find this at the top of your screen once you login. Choose Page from the menu. WordPress will load a new, empty page for you. Make sure to enter your page title before going on.
Any WordPress site can add as many new pages as you want. Even if you don’t use Divi, you could use an ordinary new page to show special offers and downloads. But you’ll still have the regular navigation menu and other baggage inherited from the default page template.
Here’s where Divi makes your pages different. You can choose a different page template that offers a completely blank canvas.
Select the Blank Page Template
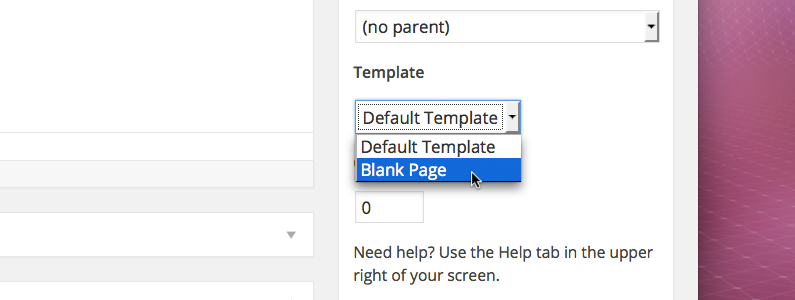
Look for the Page Attributes box in the right sidebar of your fresh Add New Page screen. Choose Blank Page from the Template drop-down menu.
If you don’t see the Page Attributes box, it may be hidden. To reveal it, scroll to the top of your screen and look for the Screen Options tab in the upper right below the toolbar. Click the tab to open a tray of options. Make sure Page Attributes is checked. The box may be added at the absolute bottom of your screen as well, so check there too. Feel free to drag and drop this box around the screen to where you want it.
The next step loads the special sauce, so be ready. It’s gonna blow your mind, I swear.
Use Page Builder
By default, the Add New Page screen loads the Default Editor. That’s cool, but we’re going bigger.
Look for the blue Page Builder button under the page title. Click the button to replace the Default Editor with a cool set of blue and gray boxes. You won’t see any place to enter text, images or content in the usual way. Not yet. Adding sections and columns to build our layout comes first. As we move through the following steps, you’ll see how content and page layout are connected.
Add a Section
From here on out, I’ll be show you how to build Roundpeg’s landing page template. Feel free to branch out and try your own! Your content will be different and this template might not serve it the best. This walk through is just an introduction to the possibilities.
Page Builder starts you out with one section. Like a spreadsheet, your page will have sections (or rows) and columns. A section can divide into halves, thirds, fourths, one half plus two fourths and so on.
Insert Columns
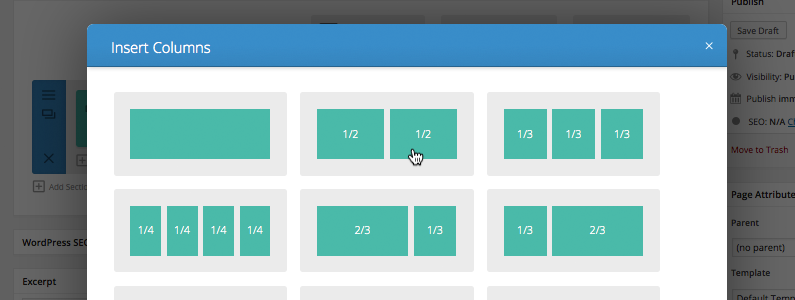
Roundpeg’s landing page begins with a header containing our logo and phone number. This header uses two columns, dividing the section into halves. Click Insert Columns and choose the 1/2 and 1/2 column option.
Insert Modules
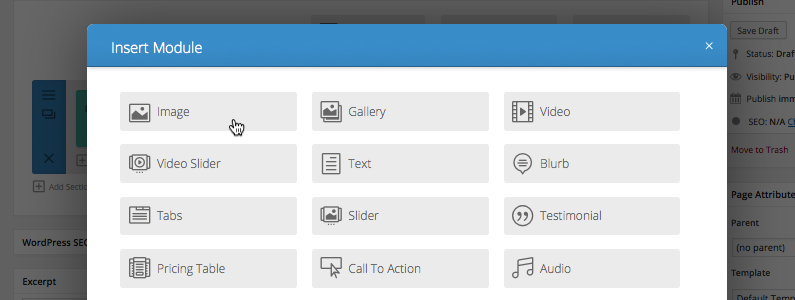
Before we add content, we need to insert modules. Modules let you fill in simple fields to format special content like staff bios, calls to action, videos, even countdown clocks. The most useful module is the basic Text Module. This lets you add text and HTML like you would in the Default Editor.
Roundpeg’s logo is added with the basic Image Module. The phone number is added with the Text Module.
A Special Note About Custom CSS
Our header section uses the CSS Class field you’ll find at the bottom of the section module settings. We’ve added a unique CSS class to the section and a unique class to each module. This lets us use custom CSS to finely tweak the look of our content.
Without custom CSS, Divi subjects content to default CSS that works, but wasn’t exactly what we wanted. You’ll get pretty far without knowing code, but your best results will come by working with a web designer to create the initial template. As we’ll see later, you can reuse the same template without needing to code a thing.
Add a Second Section
The next section is our blue headline area. Again, we’ve got custom CSS working its magic on this section. But the section’s most prominent feature, that blue background image, is easy to add. Open the Section Module settings and upload an image or choose a solid color for your background.
Add a solid (full-width) column this time and add a Text Module. We used Heading One (H1) and Heading Two (H2) paragraph styles with our headlines.
Add a Third Section
One more section to go! This time, choose the 2/3 + 1/3 column setting. Your body text goes in the 2/3 and your conversion form fills the remaining third.
A Special Note About Form Builders
The most important part of any landing page is the conversion form. This interactive signup sheet doesn’t come built in to WordPress or Divi. We use Formstack to build forms that accept and store email addresses and automatically send follow-up emails and deliver the promised content.
Other form builders work too. Try Gravity Forms, Wufoo, JotForm or even the old standby, Contact Form 7.
Once your page content is finalized and entered on the landing page, it’s time to see what it looks like.
Preview Your Landing Page
Look for the Publish box in the right sidebar. Click preview to have WordPress open a version of your landing page rendered as visitors will see it. Check for styling errors, typos and other things to tweak. And test your form! Make sure it correctly processes email addresses and delivers content like you expect.
Close the preview tab and get back into your landing page edit screen to revise it. When you’re done, click the Publish button in the Publish box to make it live.
Phew. Took us 1,000+ words, but we’ve just finished and published a landing page with WordPress and Divi. Anyone want to redo that from scratch for the next one? Not me. Thankfully, Divi lets you save what you make in Page Builder as a template for future pages.
Save Your Landing Page as a Template

Look for the gray button with the floppy disk icon. Click the button to open a pop-over form that asks you to name your layout. Name it something good like “Basic Landing Page Template” and click Save.
See the Load Layout button right next to Save Layout? Click that one to apply your template to any new page you make. All you’ll have to do is replace the content with your new stuff.
Promote Your Landing Page
Now that we’ve published a great landing page, there’s nothing left to do but work really hard to tell people about it. Strategically share the link on social media. Promote it in your blog posts and email newsletters. Add the URL to your print materials. Advertise your landing page on search engines and social networks.
Oh, and track your performance so you can figure out what works and what doesn’t. Repeat!

